Trains in Japan are famously efficient, clean, and almost always on time. They form the backbone of travel across the country, whether you’re zipping between cities on a shinkansen or navigating local metros and trams. While Japan’s rail system can look intimidating at first—multiple companies, lines, and ticket types—it quickly becomes one of the easiest and most stress-free ways to travel once you understand the basics.
This post is all about how to and tips for using trains in Japan.
Topics in this post:
click to jump to that section
What to Expect on Japanese Trains
Japanese trains run with incredible punctuality. When delays do occur (which is rare), announcements are made clearly—on platforms, onboard trains, and even in advance on station websites.
At platforms, you’ll notice markings on the ground showing exactly where to line up and where train doors will stop. Just be sure to check how many cars your train has, as not all markings apply to every service.
Stations are well signed, often with English translations, and staff are helpful if you get stuck—even with limited shared language.
Trains are generally very clean – we’ve seen cleaning crews a few times, which is great! Some have free Wifi. There are bathrooms. I personally did not notice any ‘dining’ cars, but all of the stations have vending machines, and some of the bigger stations have some fast food or convenience store options.


Etiquette on Trains & Public Transit
You’ll see signage everywhere reinforcing transit etiquette. Key things we noticed:
- Line up neatly to board (remember the markings on the ground)
- Don’t rush or run in stations
- Stand still on escalators (walking is discouraged)
- Keep voices low and phones silent
- Tuck your bags away as best as possible, trains can get busy
- A small bow when saying thank you goes a long way

Types of Trains You’ll Use
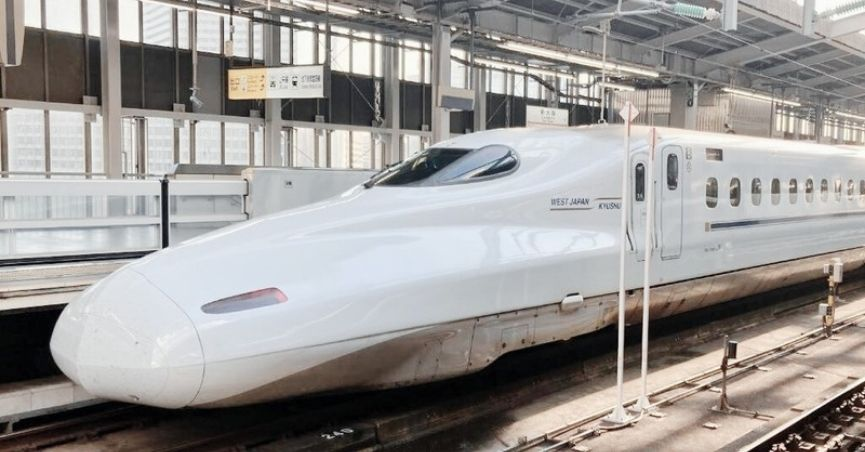
Shinkansen (Bullet Trains)
High-speed trains for long distances with limited stops. Some cities have separate Shinkansen stations marked with “Shin-” (e.g., Shin-Osaka, Shin-Onomichi). Note: Shin-Onomichi is far from the old town, while Shin-Osaka is well connected.
For perspective:
Osaka → Hiroshima (~350 km) takes 1 hour 20 minutes by shinkansen. The same distance at home would take about 4 hours driving. Wild.

Limited Express Trains
Often connecting major hubs, there are fewer stops. These are faster than local trains but slower than shinkansen. Examples:
- Haruka (Kansai Airport → Kyoto/Osaka)
- Thunderbird (Osaka → Tsuruga)
These require both a base fare + limited express fare if buying individual tickets.
Tip: If you are only using a limited train for part of your journey, buy the base fare for your whole journey, then buy a separate limited express fare for the portion you need. It ends up being a little cheaper (according to a lovely local who helped us). This might be common sense for some, but we don’t use trains regularly at home and have been searching for separate sections of our journey.
Example: we were going from Takayama to Otsu (near Kyoto). We needed a limited express ticket from Takayama to Nagoya, but then took local trains to Otsu. We bought Takayama -> Otsu base, then added the limited fare to the Takayama -> Nagoya section only. I can’t say how much yen we saved – but we definitely saved.

Local Trains
Stopping at almost all stations, local trains are the best for reaching smaller towns. Slower, but practical for getting to specific locations.
Using the JR Rail Pass (Our Experience)
We used a JR West All Areas Pass, and after a lot of research, it made the most sense for our route. It didn’t cover all our train travel, but the longest and most expensive legs. It covered:
- Kyoto → Hiroshima (shinkansen)
- Hiroshima → Miyajima Island (round-trip ferry)
- Hiroshima → Onomichi (shinkansen)
- Onomichi → Osaka (shinkansen)
- Osaka → Kanazawa (limited express + shinkansen)
- Kanazawa → Toyama (shinkansen)

The pass allowed six seat reservations, even on the Shinkansen, which was incredibly helpful during busy routes.
We purchased separate tickets for:
- Kansai Airport → Kyoto (Haruka limited express)
- Toyama → Takayama (Hida local train)
- Takayama → Otsu (Hida local train + limited express + local train)
- Otsu → Kansai Airport (local train + Haruka limited express)
Tip: There are excellent online calculators that compare individual ticket prices vs. passes—well worth using before committing. Link here.
JR Pass Tips
- When buying your JR Pass online, you can make one initial seat reservation in advance and modify it later. But you can only do it online before you pick up the pass, because once you do, all reservations are made at ticketing offices or via designated machines (less convenient).
- For seat reservations, look for green JR ticket machines with “5489” in a blue square. The machines have multiple language options.
- You must pick up your pass in person at a designated JR office, which you choose upon purchase. We picked up at Kyoto Station, which was very busy (we had to take a number). So plan extra time.
- The pass is a paper ticket, so take care of it. You’ll insert it into ticket machines throughout your trip.
- At ticket gates, look for gates with a yellow ticket slot or show your ticket to staff—IC-only tap gates won’t work with a JR Pass.
- If you don’t reserve seats, use non-reserved cars, which will be indicated on signage in the station or on the platform. These can get very busy. Our Onomichi → Osaka ride was standing-room only.
- Some trains are reservation-only, so always check in advance.
How to Reserve Seats:
- Find a green JR ticket machine with 5489 in a blue square.
- Choose your language
- Select Coupon Ticket
- Insert your rail pass
- Search for your train
- Choose seat type (Green Cars cost extra; some female-only seating exists)
- Receive separate seat reservation tickets


City Transport: IC Cards Are Essential
City-based transport is usually run by individual municipalities and does not accept JR Passes. Your best bet is to buy an IC card. IC cards make travel easy—just tap in and out. They also work at vending machines, convenience stores, luggage lockers and some restaurants. There are a few different types – ICOCA, Suica, and PASMO. They are kind of region-specific, but technically are usable nationwide. ICOCA is in western Japan & the Kansai area; Suica is in Tokyo and eastern Japan; PASMO is in the Tokyo metro area.
We used ICOCA IC cards as we travelled in western Japan. We used it on:
- Buses (Kanazawa, Takayama)
- Metro/Subway (Kyoto, Osaka)
- Trams (Hiroshima)
IC Card Tips
- Physical cards require a 500 yen deposit (refundable if you return in person at a JR station)
- Usually need cash to purchase or top up
- Apple Wallet supports IC cards; Android support is limited
Etiquette for the metro, buses and trams is similar to trains – line up, be respectful of space and volume. Most modes had multiple visual displays of the route and next stops, as well as announcements. We never felt lost or missed stops. That being said, we did actively use Google Maps for tracking our route.
Final Thoughts
Japan’s train and metro system isn’t just transportation—it’s part of the experience. Once you understand passes, seat reservations, and etiquette, getting around becomes seamless and even enjoyable. From lightning-fast Shinkansen to scenic regional routes and ultra-efficient city transit, trains make Japan incredibly accessible.
If you’re planning a trip and feeling overwhelmed, don’t be. With a little preparation, you’ll be navigating stations like a pro—and probably wishing your home country ran trains this well (we certainly do!)
Have questions about routes, passes, or planning your own Japan itinerary? Drop them in the comments—we’re happy to help.
Pin this for later…

You might also want to read…


Leave a Reply