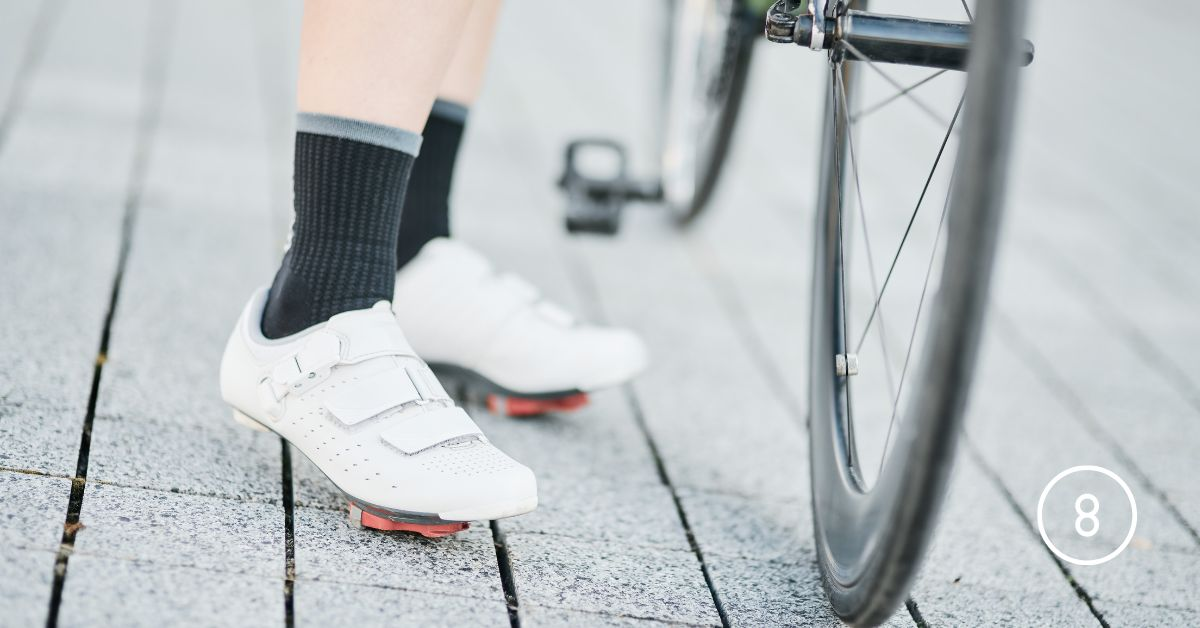
At some point in your cycling journey, you are going to start considering things that make you feel more like a cyclist. The click-clack click-clack of cycling shoes on the coffee shop floor is certainly one of them. It is a big game-changer. Once you’ve tried them, most riders never look back. But it is not as easy as upgrading to a pair of spandex or changing your tires. Save full road cleats for once you are confident with other aspects of the bike, like shifting gears seamlessly, balance and control. Hopefully, my less-than-easy transition experience can make it a little easier for you!
What are “clipless” pedals — and why that name makes no sense
Here’s the irony: clipless pedals are called “clipless” because they replaced the old toe-clip cage system popular in the 1980s. They actually do clip your shoe to the pedal via a small metal or plastic piece called a cleat. The cleat is bolted to the sole of your cycling shoe and locks into the pedal with a click. To release, you twist your heel outward, and you’re free. It takes about five minutes to learn the process, but a lifetime to appreciate.

Why make the switch?
Flat pedals work fine, but clipless pedals change how you interact with your bike. Here’s what you gain:
- More efficient pedalling — Your foot stays in the optimal position throughout the entire stroke, so you’re not wasting energy correcting foot placement mid-ride.
- Power on the upstroke — Clipped in, you can pull up as well as push down, engaging more muscle groups and smoothing out your cadence.
- Better control — Your foot won’t slip off when it’s wet, or bounce on rough terrain. The connection between you and the bike becomes much more direct.
- Reduced fatigue — Stiffer cycling shoe soles spread the load across your whole foot, eliminating the “hot spot” pressure you get with soft-soled shoes on flat pedals.
- Confidence on climbs — When you’re grinding up a hill, the last thing you want is to lose your footing. Clipless pedals keep you locked in and driving power through every stroke. Though I find I am more nervous on climbs because my feet are clipped in….
Tips for transitioning
The learning curve here is real, but you don’t realize it until it’s likely too late and you are in the process of tipping over. The concept of clipping in and out is relatively easy. Your foot/shoe goes in at a specific angle, you hear the click, and you are in. You twist your heel outwards, you’re out. But factor in stopping unexpectedly, being on a funny angle, and so much more – then you forget you are literally attached to your bike. But the nice thing is, any cyclist you talk to will tell you that you will fall. It’s not a secret – so don’t feel bad about it happening. Here are some tips that helped me transition to clipless pedals.
Tip 1
Start on grass, gravel or a trainer.
Practice clipping in and out while stationary, leaning against a wall or fence. Grass softens any slow-speed falls.
Tip 2
Set the tension low
Most clipless pedals have a release tension adjustment. Start at the lowest setting so unclipping is easy while you’re learning.
Tip 3
Think about stops early
Before approaching a red light or junction, remind yourself to unclip one foot in advance. Most tip-overs happen at standstills.
Tip 4
Choose a foot
Choose a foot to unclip with everytime. Then it becomes more an automatic behaviour than something you have to think about. Mark likes to unclip his right foot – so he can lean on the curb. I prefer my left because my right is going to have a stronger pedal to get going.
Tip 5
Keep at it
When you do fall off, make sure to get back on and try again soon. I let my fear win, went back to flats, and then it took me so much longer to get back into the clips.
Tip 6
Clip in on the go
Push off with your free foot, then click in once you’re rolling. Trying to clip in while stationary is harder than it looks.
Tip 7
Ride quiet roads first
Give yourself a few sessions somewhere low-traffic so you can focus on clipping technique without worrying about traffic.
Tip 8
Check cleat alignment
Poorly aligned cleats cause knee pain. Have a shop fit them, or position the cleat so the ball of your foot sits directly over the pedal axle.
Tips for everyday use
Once you’re comfortable clipping in and out, a few habits will make the experience even better:
- Keep cleats clean — Mud and grit in the cleat mechanism can make release harder. Rinse them off after muddy rides.
- Replace worn cleats — Most cleats show wear indicators. When the grooves are gone, replace them — worn cleats release unpredictably and can damage pedals.
- Lube the pedal springs occasionally — A drop of chain lube keeps the release mechanism smooth, especially on metal-bodied pedals.
- Walk carefully off the bike — Road cycling cleats stick out below the shoe and are notoriously slippery on smooth floors. Take short steps and watch for wet surfaces.
- Double-check clip-in — Listen for the click. A half-engaged cleat is worse than no cleat — it can release at the wrong moment.
Types of clipless pedals
Different riding styles call for different systems. Here’s a breakdown of the most common types:
Road – SPD-SL
Large three-bolt cleats (Shimano SPD-SL, Look Keo, Speedplay) are designed for maximum power transfer. Best for road bikes and long-distance riding. Awkward to walk in (these give you the typical click-clack sound).
Mountain / MTB – SPD & MTB-style
Two-bolt recessed cleats (Shimano SPD is the standard) that sit inside the shoe sole. Far easier to walk in — great for beginners, commuters, and gravel riders.
Indoor Cycling – Delta / 3-bolt spin
Many spin bikes and Peloton-style machines use a Delta-compatible cleat (similar to Look). Check your studio or bike’s pedal type before buying shoes.
Dual-sided
One side clips in (usually SPD), the other is a flat platform. A great option while learning — you can use regular shoes on the flat side during low-key rides.


If you’re just starting, an SPD-style MTB pedal is almost always the right recommendation — they’re affordable, walkable, and compatible with a huge range of shoes. I started with these clips on the dual-sized pedals. I think it gave me comfort to have the flats for the sections I was uncomfortable on. Now I am on SPD-SL, but note that the clipping in and out is slightly different, so there is a second transition learning curve. I do still use the MTB clips for my gravel bike and when we cycle tour because of the recessed clips. Better for being able to walk easily at stops.
Final Thoughts
Clipless pedals are one of those upgrades that feel daunting right up until the moment they don’t. The first time everything clicks — literally — and you roll away smoothly, feet locked in and pedalling in perfect circles, you’ll wonder why you waited so long.
You don’t need to spend a fortune to get started. A mid-range SPD pedal and a comfortable pair of mountain bike shoes will serve most beginners better than high-end road gear that’s painful to walk in. Get the basics dialled, build your confidence, and upgrade from there as your riding evolves.
And if you do end up on the floor at a red light? Welcome to cycling. It happens to everyone — and you’ll laugh about it, eventually.
Pin me for later…

Browse more of our Beginner Cycling posts:

From Running Shoes to Pedals: How I Fell in Love with Cycling

Cycling Gear 101: What You Actually Need (and What You Don’t)

Understanding your Road Bike Gears & Cadence

10 Tips for Beginner Cycling Route Planning

Fueling on the Bike & Avoiding Bonking

8 Tips for Building Mental Toughness on the Bike

Beginner Bike Maintenance: Pre-Ride Checks
More cycling posts:


Leave a Reply